How to Use Cleanlab Studio With Your Data Stored in Snowflake

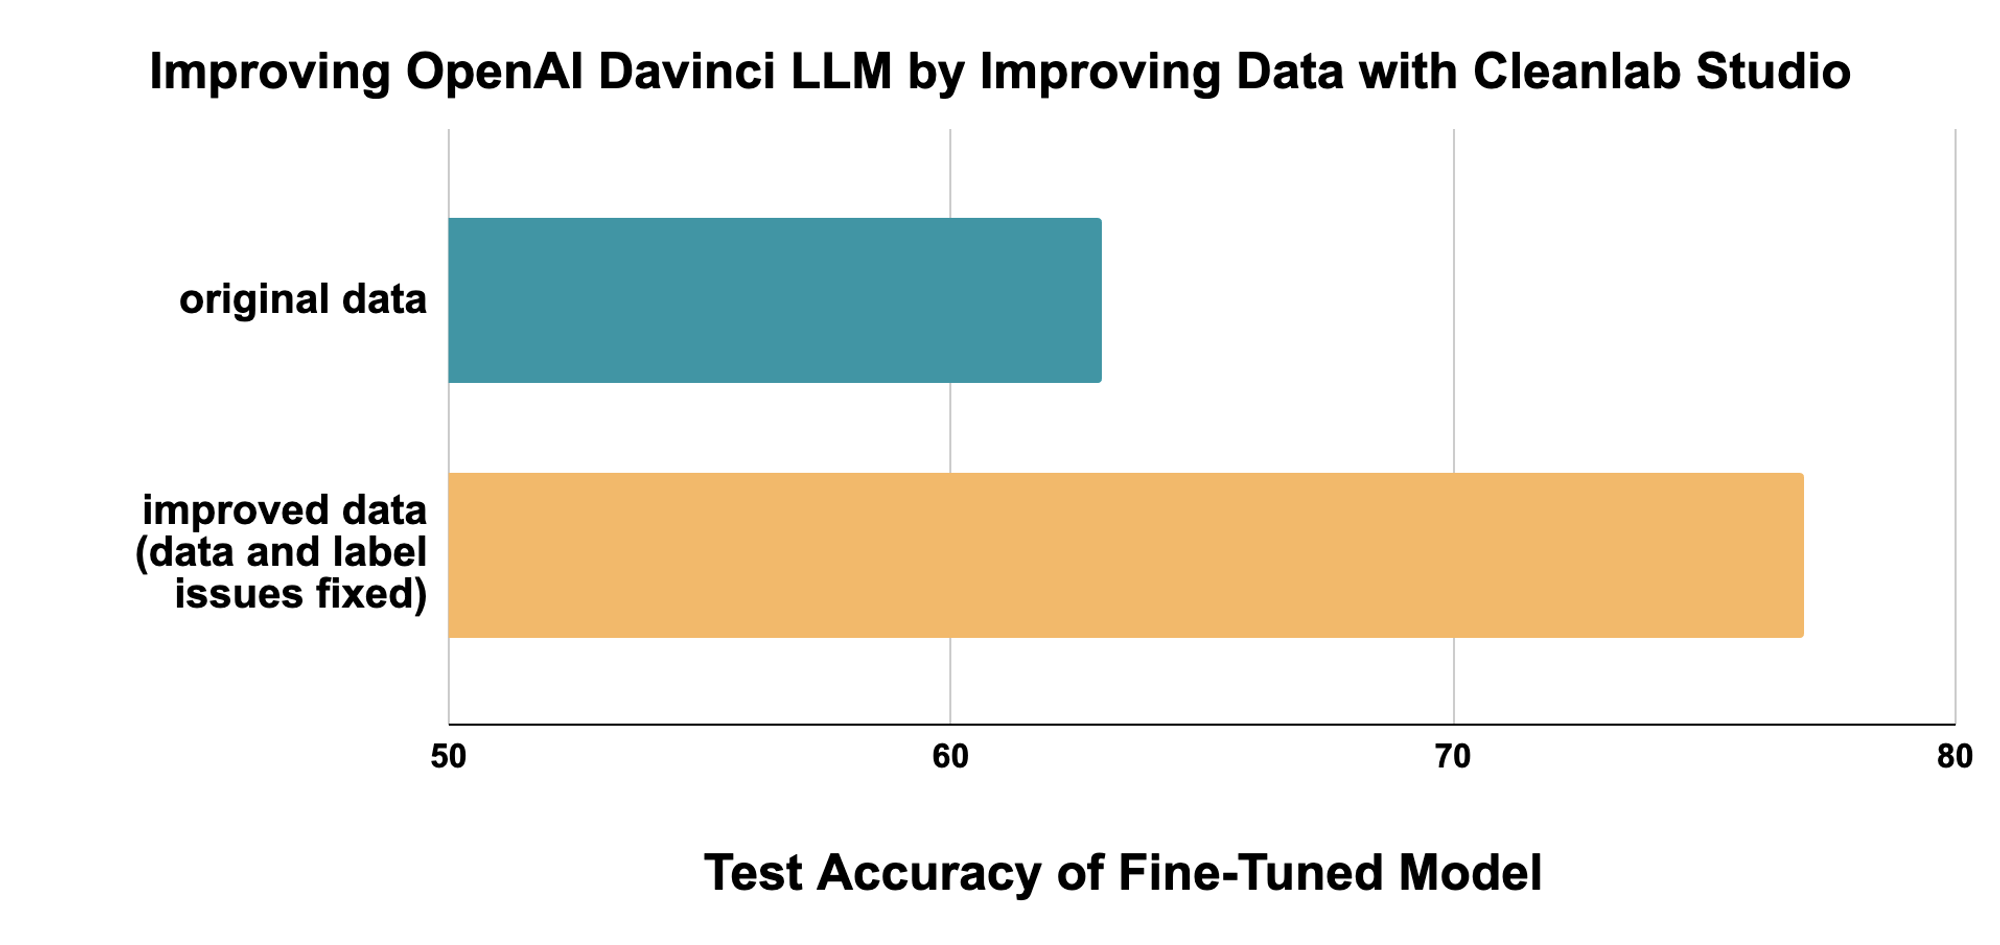
This tutorial demonstrates how to run Cleanlab Studio on data stored in the Snowflake platform. As an example, we consider an application of text classification with LLMs, improving the models by improving the data they are fine-tuned on. We’ll see how Cleanlab Studio systematically improves the training data to boost LLM performance by 37%, without requiring you spending any time or resources to change the model architecture, hyperparameters, or the training process.

LLMs acquire powerful generative and discriminative capabilities after being pre-trained on a large corpus of text (usually scraped from the internet), but producing reliable outputs for a particular business use case often requires additional training (fine-tuning) on a labeled data set from the application domain.
Labeled data powers AI/ML in the enterprise, but real-world datasets have been found to contain between 7-50% annotation errors. Imperfectly-labeled text data hampers the training (and evaluation of) ML models across tasks like intent recognition, entity recognition, and sequence generation. Although pretrained LLMs are equipped with a lot of world knowledge, their performance is adversely affected by noisy training data (as noted by OpenAI). This tutorial illustrates how using Cleanlab Studio to improve the training data can mitigate the negative effects of bad data (such as erroneous labels) without writing code or spending time to change the model architecture, hyperparameters, or training process. Because Cleanlab Studio improves the data itself (regardless of which model is used) it remains applicable for LLMs that are yet to be invented, like GPT-10.
This tutorial applies LLMs to a politeness classification task, beginning by fine-tuning OpenAI’s Davinci model on the original dataset. The baseline model achieves moderate performance, but by automatically finding and fixing errors in the data using the Snowflake connector for Cleanlab Studio, we can achieve significantly better performance using the same LLM model and fine-tuning process, just by improving the data (and spending minimal human time manually reviewing data). We see a 37% reduction in LLM prediction error after using Cleanlab Studio to improve the dataset:
See the accompanying blog post for additional context on LLMs and fine-tuning, why data quality matters for LLMs and ML tasks in general, and how Cleanlab Studio can help you easily improve ML model robustness and performance by systematically improving data quality.
Install and configure dependencies
As an example of how data curation can improve ML models, this tutorial fine-tunes a model from OpenAI. Note: OpenAI is not a dependency requirement of Cleanlab Studio. Our Data Curation platform can be used to improve any ML model (or even to improve Data outside of ML applications), OpenAI is used here just as an example model.
pip install openai
pip install snowflake-snowpark-python
Configure OpenAI API key
Note that invoking the OpenAI API will use credits or bill you. The estimated cost to run this tutorial is 15 dollars with the Davinci model, which is the most powerful and most expensive. You can also scale down to the Curie or Ada model to reduce costs, by setting openai_model in the cell below, replacing “davinci” with “curie” or “ada”. Fine-tuning the Ada model costs 1 dollar per run with the given dataset.
Put your OpenAI API key in the cell below. You can find your API key at https://platform.openai.com/api-keys.
import openai
from openai import OpenAI
import os

# we set the environment variable because it is used by the OpenAI command-line tool
os.environ['OPENAI_API_KEY'] = "<YOUR_OPENAI_API_KEY>"
# we also set the .api_key property below for the Python API
openai.api_key = os.environ['OPENAI_API_KEY']
# set openai model name
openai_model = 'davinci'

client = OpenAI(
    api_key=os.environ.get("OPENAI_API_KEY"),
)
Set up a Snowflake connector
Connect to Snowflake using Snowpark. Select the database and schema you want to store this tutorial’s datasets under. You may also need to specify the role and warehouse to use for the session.
from snowflake.snowpark import Session

# Create a Snowflake session
config_dict = {
    "account": "<YOUR_SNOWFLAKE_ACCOUNT_NAME>",
    "user": "<YOUR_SNOWFLAKE_USER_NAME>",
    "password": "<YOUR_SNOWFLAKE_PASSWORD>",
    "database": "<YOUR_SNOWFLAKE_DATABASE>", # database to store datasets in
    "schema": "<YOUR_SNOWFLAKE_SCHEMA>", # schema to store datasets in under database
    "warehouse": "<YOUR_SNOWFLAKE_WAREHOUSE>", # compute resource cluster to use
    "role": "<YOUR_SNOWFLAKE_ROLE>", # optional: may need to specify role to ensure you have correct permissions
}

session = Session.builder.configs(config_dict).create()
Download and prepare data
Here we consider a 3-class variant of the Stanford Politeness Dataset, which has text phrases labeled as: impolite, neutral, or polite. Annotated by human raters, some of these labels are naturally low-quality.
The training dataset has 1916 examples each labeled by a single human annotator, and thus some may be unreliable.
The test dataset has 480 examples each labeled by 5 annotators, and we use their consensus label as a high-quality approximation of the true politeness (measuring test accuracy against these consensus labels). To ensure a fair comparison, this test dataset remains fixed throughout the experiments in this tutorial (all data quality improvement is done only for the training set).
To prepare the data, we download raw data into snowflake DataFrames, do some processing to prepare the dataset for downstream tasks, store intermediate files in Snowflake stages, and save the processed data in Snowflake tables.
import pandas as pd

politeness_train = session.create_dataframe(pd.read_csv("https://cleanlab-public.s3.amazonaws.com/StudioDemoDatasets/improving_llms/train.csv"))
politeness_test = session.create_dataframe(pd.read_csv("https://cleanlab-public.s3.amazonaws.com/StudioDemoDatasets/improving_llms/test.csv"))
politeness_train.write.mode("overwrite").save_as_table("politeness_train")
politeness_test.write.mode("overwrite").save_as_table("politeness_test")
We can inspect this prepared data, looking at some specific rows to highlight data errors that are present. For example, the data point on row 1426 is erroneously labeled “impolite” when “polite” is a more appropriate label.
display(politeness_train.to_pandas().iloc[[1426, 299, 134]])
| prompt | completion | |
|---|---|---|
| 1426 | Thanks for your response! How should we proceed ? | impolite |
| 299 | Alright then!? | neutral |
| 134 | That image is CC and has a link to its source.... | polite |
Formatting data for fine-tuning
We are using the OpenAI APIs for fine-tuning, which require data in a specific format (JSONL, newline-delimited JSON objects). We also need to do some pre-processing of the label column, adding whitespace before the completion, as the API recommends.
We save the prepared results on a Snowflake stage, which can be used by the OpenAI API.
import json
import io
import snowflake.snowpark.functions as F

_ = session.sql("create or replace stage politeness_prepared_data").collect()

def prepare_data(df, path, stage="politeness_prepared_data"):
    '''
    Write a dataframe into a single JSONL file located at path under a specified stage, in a format appropriate for fine tuning.

    This makes a small tweak to the data, namely, adding whitespace before the completion.
    '''
    # add whitespace to the completion, as OpenAI requires
    df = df.withColumn('"completion"', F.concat(F.lit(' '), '"completion"'))

    fileobj = io.BytesIO()
    for row in df.to_local_iterator():
        fileobj.write(str.encode(f'{json.dumps(row.as_dict())} \n'))
    fileobj.seek(0)

    put_result = session.file.put_stream(fileobj, f"@{stage}/{path}", auto_compress=False)
    print(f"{path} {put_result.status}")


prepare_data(politeness_train, 'processed_train.jsonl')
prepare_data(politeness_test, 'processed_test.jsonl')
Fine-Tune and evaluate OpenAI model without Cleanlab Studio (accuracy ~65%)
We use the OpenAI fine-tuning API to first establish a baseline by:
- Fine-tuning the OpenAI model on our (original, with some errors) training set
- Evaluating the model on our test set
First, we upload our training set and test set to OpenAI:
processed_train_jsonl = session.file.get_stream("@politeness_prepared_data/processed_train.jsonl")
processed_test_jsonl = session.file.get_stream("@politeness_prepared_data/processed_test.jsonl")

train_file = client.files.create(file=processed_train_jsonl, purpose='fine-tune')
test_file = client.files.create(file=processed_test_jsonl, purpose='fine-tune')
Then, we invoke the fine-tuning API to fine tune the openai_model (“davinci” by default, unless you changed it above). Note that this incurs some cost, roughly $7.50 for the Davinci model or $0.50 for the Ada model, at the time this was written.
We also invoke the fine-tuning API with the validation_file keyword argument, so that the API will automatically compute statistics including model accuracy on the test set after the fine-tuning process.
response = client.fine_tunes.create(
    training_file=train_file.id,
    validation_file=test_file.id,
    compute_classification_metrics=True,
    classification_n_classes=3,
    model=openai_model,
    suffix='baseline'
)
You can follow the progress of fine-tuning with the following command. Once it’s done, it’ll print “Job complete!“. You might need to re-run the cell if it times out. Training time varies based on queue length and other factors; it can take up to 1 hour to fine-tune the LLM. The block below would check the status of the finetune and block execution until the finetune is complete. The block is based on this openai-cookbook example.
import time

def wait_for_finetune(job_id):
  status = client.fine_tunes.retrieve(fine_tune_id=job_id).status
  if status not in ["succeeded", "failed"]:
      print(f'Job not in terminal status: {status}. Waiting.')
      while status not in ["succeeded", "failed"]:
          time.sleep(60)
          status = client.fine_tunes.retrieve(fine_tune_id=job_id).status
          print(f'Status: {status}')
  else:
      print(f'Finetune job {job_id} finished with status: {status}')

wait_for_finetune(response.id)
Once the job completes, we see the test accuracy achieved when fine-tuning this LLM on the original training dataset.
import io

def get_accuracy(fine_tune_id):
    file_id = client.fine_tunes.retrieve(fine_tune_id=fine_tune_id).result_files[0].id
    file_content = client.files.content(file_id=file_id).text
    base_df = pd.read_csv(io.StringIO(file_content))
    baseline_acc = base_df.iloc[-1]['classification/accuracy']
    print(f"Fine-tuning Accuracy: {baseline_acc:.1%}")

get_accuracy(response.id)
Baseline results: ~65% accuracy
Our baseline Davinci LLM achieves a test accuracy of 65% when fine-tuned on the original training data (Curie achieved 64% accuracy, Ada achieved 60% accuracy). Model training is nondeterministic, so your results might vary slightly, even with the exact same dataset and initial model checkpoint. OpenAI’s models might also be changed/updated over time.
Even a state-of-the-art LLM like the Davinci model produces lackluster results for this classification task; is it because of low data quality?
Improve the data using Cleanlab Studio and re-train the LLM (accuracy ~78%)
Next, we use the Snowflake connector for Cleanlab Studio to automatically improve the data quality, and then re-train our LLM.
Set up Cleanlab Studio
- If you don’t have an account already, sign up for an account. It may take up to one day to get access.
- Get your API key and enter it below
pip install --upgrade cleanlab-studio
import cleanlab_studio

CLEANLAB_STUDIO_API_KEY = "<YOUR_CLEANLAB_STUDIO_API_KEY>"
studio = cleanlab_studio.Studio(CLEANLAB_STUDIO_API_KEY)
Upload dataset to Cleanlab Studio
Next, we can directly upload a Spark DataFrame to Cleanlab Studio by passing it to studio.upload_dataset().
dataset_id = studio.upload_dataset(politeness_train, dataset_name='Stanford Politeness')
Create a project
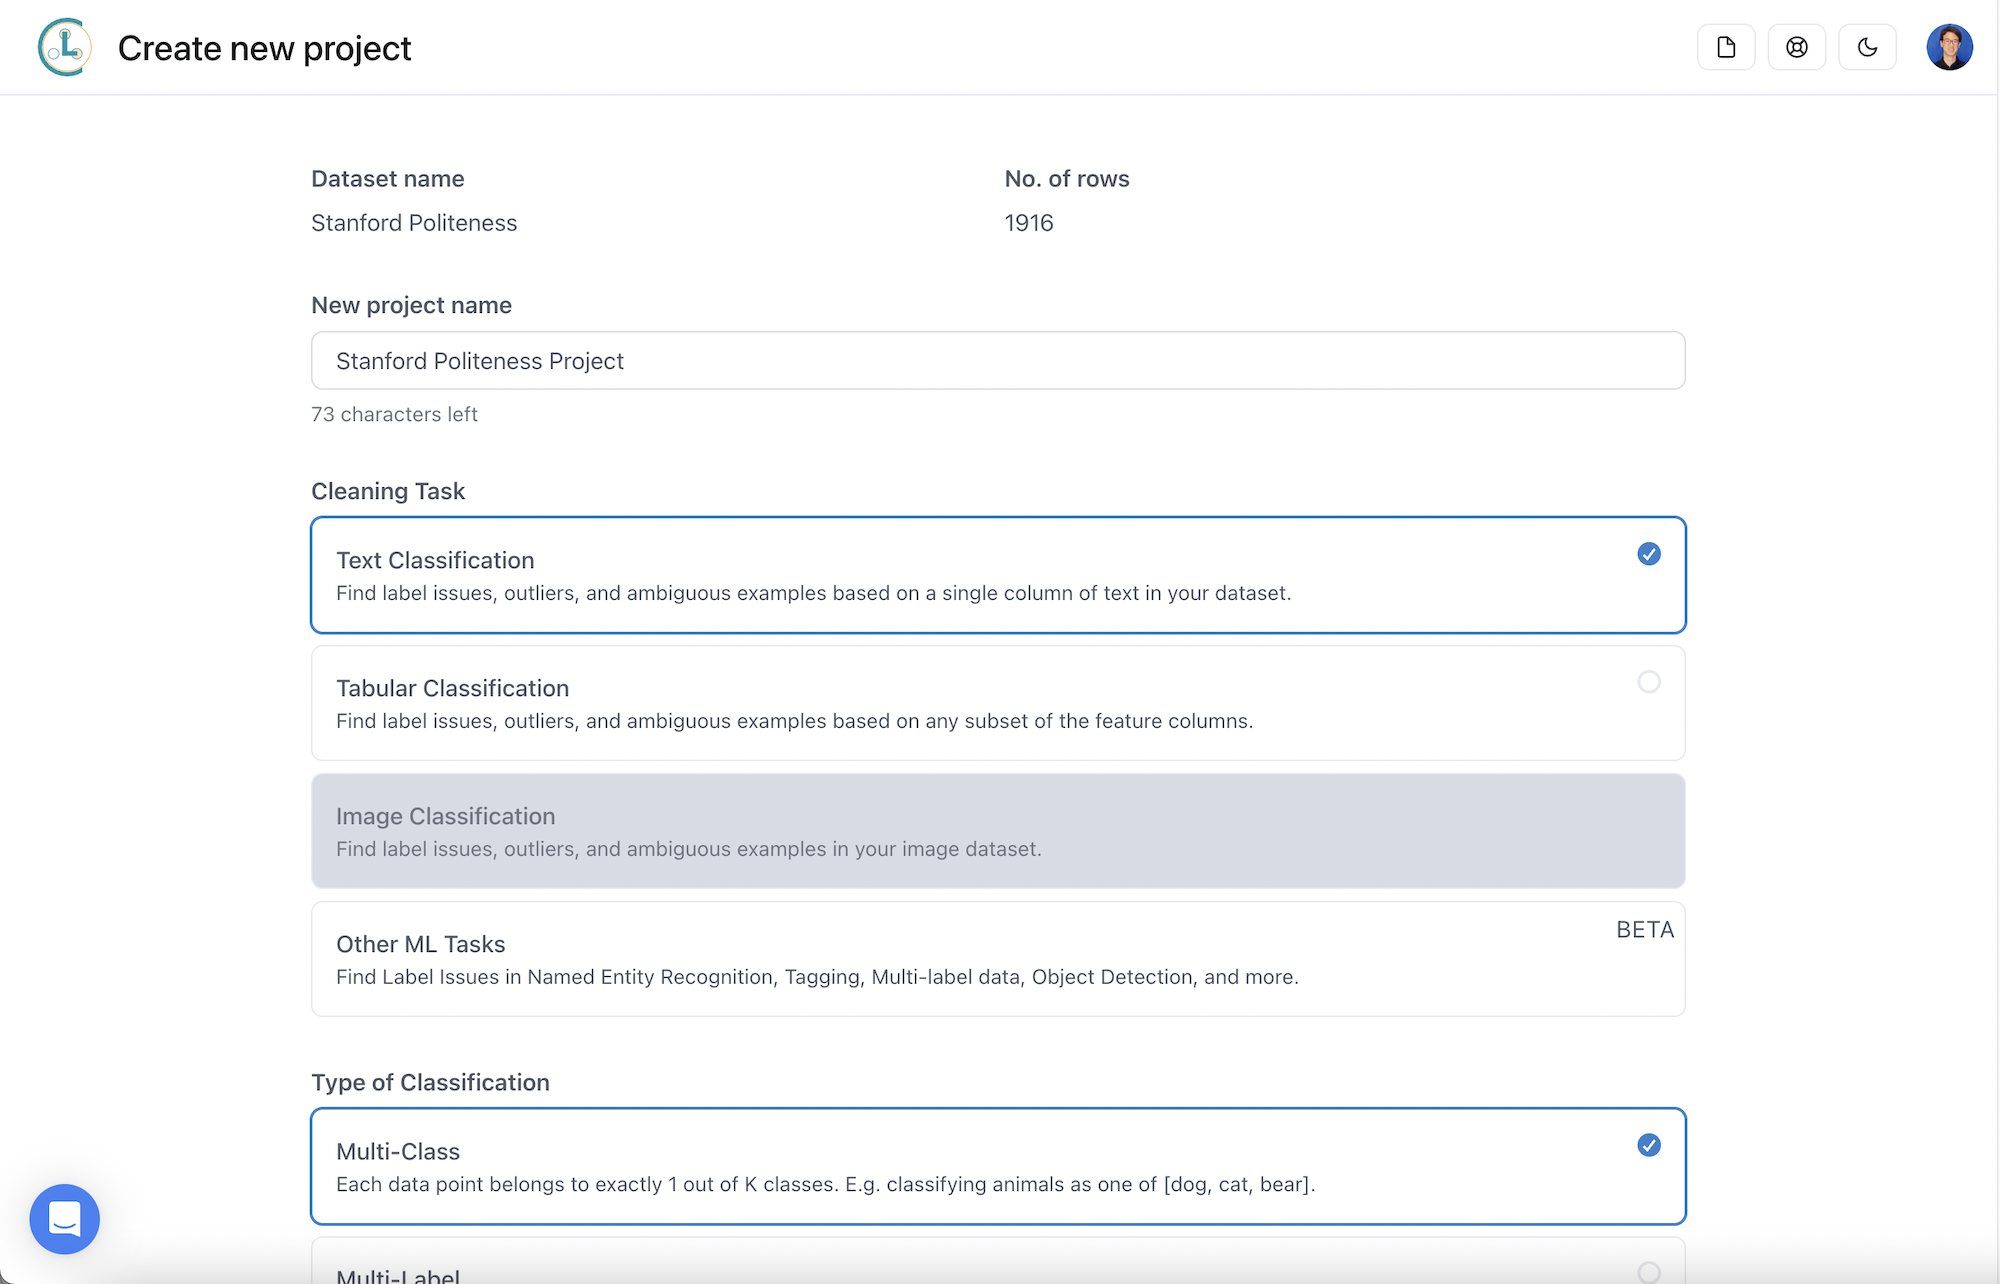
To analyze the data, use the Cleanlab Studio web UI to create a project, configuring it according to the ML task. For this demo, you should select:
- ML task: text classification
- Type of classification: multi-class
- Text column: prompt (will be auto-detected)
- Label column: completion (will be auto-detected)
Select fast mode or regular mode depending on the speed/quality tradeoff you desire.
Make corrections to your dataset with Cleanlab Studio
Cleanlab Studio not only finds data points with potential issues, but it also makes suggestions for how to address the issues (e.g., changing the label of a data point). Deciding how to make use of the analysis results is up to you. For example, you could discard all potentially erroneous data points, or you could review the data points most likely to have issues and make corrections. This human-in-the-loop data correction usually gives the best results.
If you want to save time, you could briefly review some flagged issues, and then auto-fix the top issues.
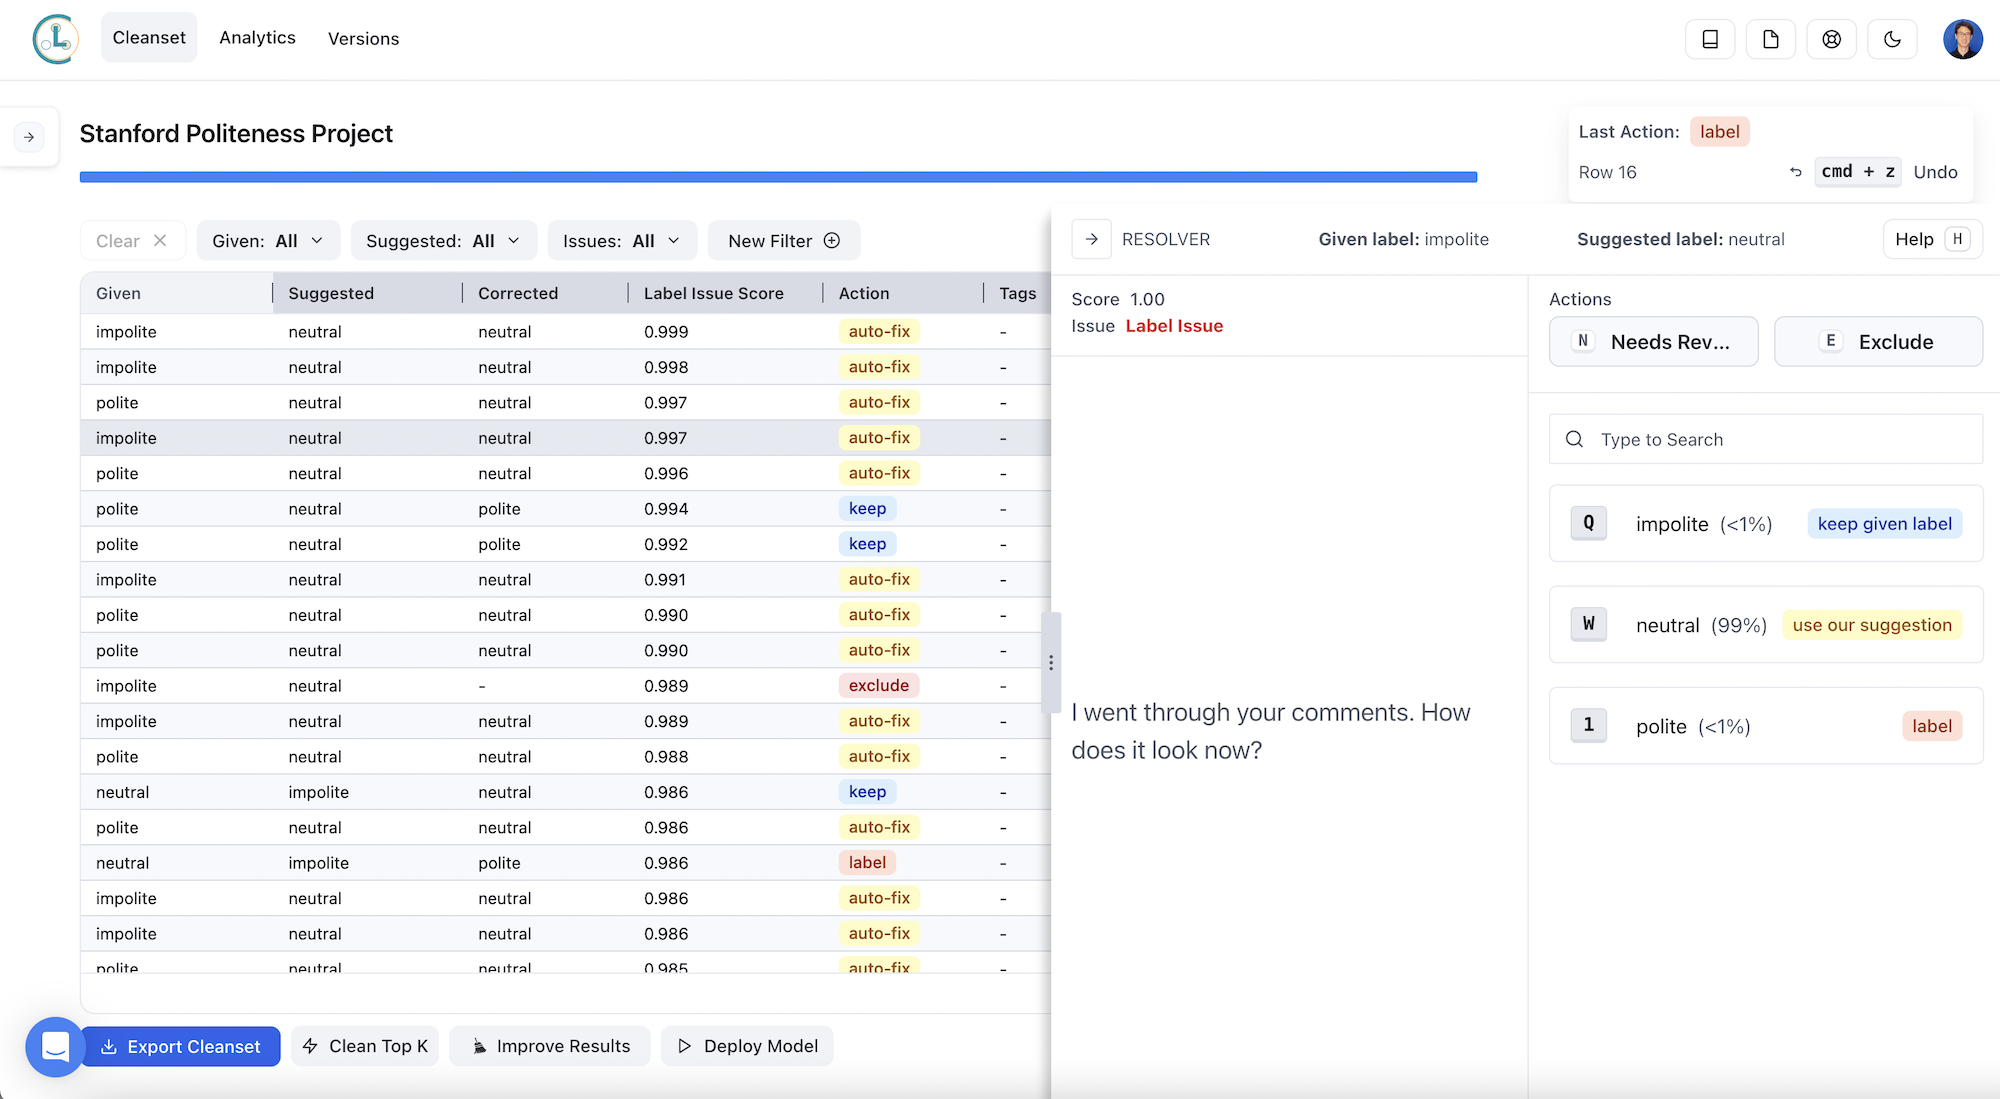
The selected row in the screenshot above is an example of a poorly-labeled datapoint.
The phrase:
I went through your comments. How does it look now?
is labeled “impolite”. Cleanlab Studio flags this as a label error, and it suggests that the label be switched to “neutral”. In the screenshot above, we pressed “W” to accept Cleanlab Studio’s suggestion to automatically fix the label.
Label issues like this cause the accuracy of the fine-tuned LLM to be degraded. Correcting these issues allows us to train an improved LLM, as we’ll see below.
Export your improved dataset back into Snowflake
Once you’re done correcting issues found in your dataset with Cleanlab Studio, export the improved dataset back into Snowflake as a table:
- Click on the “Export Cleanset” button in your Cleanlab Studio project
- Select the “Export using API” tab
- Copy the “cleanset ID” and paste it into the cell below
cleanset_id = "<PASTE YOUR CLEANSET ID HERE>"
politeness_train_fixed = studio.apply_corrections(cleanset_id, politeness_train)
politeness_train_fixed.write.mode("overwrite").save_as_table("politeness_train_fixed")
display(politeness_train_fixed.to_pandas())
Fine-tune the LLM on your improved dataset and evaluate the results
Let’s see how Cleanlab Studio improves the performance of the LLM. We follow the same process as earlier, except we use the politeness_train_fixed DataFrame as our training data.
When we ran the experiment below, we used Cleanlab Studio’s web interface to review the data issues that it flagged. Machine-augmented human-in-the-loop data improvement often gives the best results. If you want to use the dataset that we exported from Cleanlab Studio, uncomment the line below.
# By default for reproducibility, we use the dataset that we exported from Cleanlab Studio as csv
# But if you want to use your dataset that you improved, downloaded as politeness_train_fixed above
# set the flag below to 'False'
use_provided_training_set_improved_using_cleanlab_studio = True
if use_provided_training_set_improved_using_cleanlab_studio:
    politeness_train_fixed = session.create_dataframe(pd.read_csv('https://cleanlab-public.s3.amazonaws.com/StudioDemoDatasets/improving_llms/train_fixed.csv'))

prepare_data(politeness_train_fixed, 'train_fixed.jsonl')

train_fixed_jsonl = session.file.get_stream("@politeness_prepared_data/train_fixed.jsonl")
train_file_fixed = openai.files.create(file=train_fixed_jsonl, purpose='fine-tune')

response_fixed = openai.fine_tunes.create(
    training_file=train_file_fixed.id,
    validation_file=test_file.id,
    compute_classification_metrics=True,
    classification_n_classes=3,
    model=openai_model,
    suffix='fixed'
)
You can follow the progress of fine-tuning with the following command. Once it’s done, it’ll print “Job complete!“. You might need to re-run the cell if it times out. Training time varies based on queue length and other factors; it can take up to 1 hour to fine-tune the LLM. We use the wait_for_finetune function defined before to block this step until the finetuning is done.
wait_for_finetune(response_fixed.id)
Once the job completes, we see the test accuracy achieved when fine-tuning this LLM on the improved dataset. If you simply auto-fixed some of the labels (spending zero human time on data improvement), you’ll still see improvement; if you reviewed some of Cleanlab Studio’s suggestions following a human-in-the-loop data cleaning process, you’ll see larger improvements here.
get_accuracy(response_fixed.id)
Impact of data improvement using Cleanlab Studio: ~78% accuracy (compared to ~65% baseline accuracy)
Training on the improved dataset, we see a test accuracy of 78% for the Davinci model (Curie achieved ~76% accuracy, Ada achieved ~75% accuracy). These results are from our train_fixed.csv (provided above); results on your dataset will vary depending on how you improved the dataset using Cleanlab Studio (e.g., whether you used auto-fix or manually reviewed the top issues, how you corrected labels, how you removed outliers, etc.). Even the results of fine-tuning on the provided dataset might vary slightly, because model training is nondeterministic, and OpenAI’s initial model checkpoints may be updated over time.
In this evaluation, we see that data quality has a huge impact on LLM performance. By simply improving the data quality (and leaving the original LLM checkpoint, training parameters, fine-tuning process, etc. as-is), we have reduced prediction error by ~37%. Because Cleanlab Studio improves models by improving the underlying data, the strategy outlined here works for any model or LLM that exists today or may exist in the future!