Finding Issues in Large-Scale Image Datasets

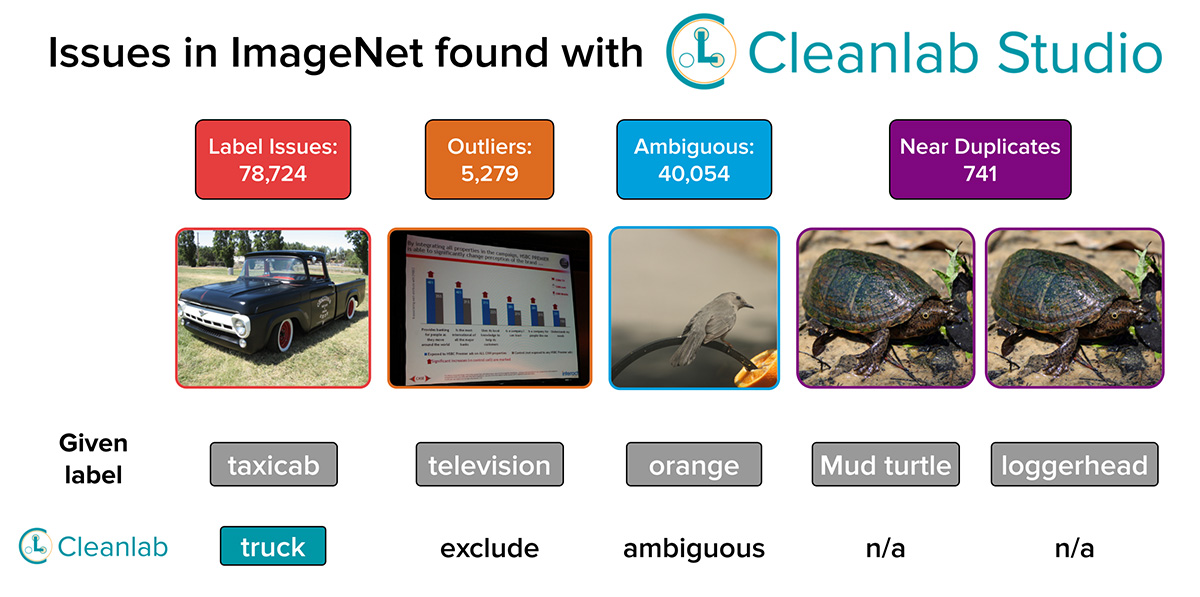
In this tutorial, we’ll leverage Cleanlab Studio to automate data quality improvements on a large scale image dataset. This tutorial uses the ImageNet dataset as an example, but the same methods can easily be applied to your own large scale datasets! For an in depth analysis of Cleanlab Studio’s results on ImageNet, see our accompanying blog post.
Overview of what we’ll do in this tutorial:
- Prep a large image dataset to be analyzed with Cleanlab Studio
- Create a Project that automatically runs various data quality checks
- Review the results of these quality checks and accordingly make corrections to your dataset
- Produce a cleaned version of the dataset
Install and import required dependencies
You can use pip to install all packages required for this tutorial as follows:
%pip install boto3 pandas requests tqdm cleanlab-studio
from cleanlab_studio import Studio
from tqdm import tqdm
import boto3
import pandas as pd
import pathlib
import requests
Optional: Initialize helper methods to render url column of DataFrame as images (click to expand)
from IPython.core.display import HTML

def url_to_img_html(url: str) -> str:
    return f'<img src="{url}" width="100" alt="" />'

def display(df: pd.DataFrame) -> None:
    return HTML(df.to_html(escape=False, formatters=dict(url=url_to_img_html)))
Prep and Upload Dataset
Large image datasets are often stored in data lakes like AWS S3 or Google Cloud Storage Buckets. Using Cleanlab Studio’s externally-hosted media format, you can directly analyze images stored in your data lake without having to manually download and upload them to Cleanlab Studio. In this tutorial, we’ll show you how to take images that are hosted in a public S3 bucket and format a dataset that you can upload to Cleanlab Studio.
Prep Data
We want to create a file that looks like this:
id,url,class_id,class_name
0,https://cleanlab-public.s3.amazonaws.com/StudioDemoDatasets/imagenet-1k/n01440764/n01440764_6130.JPEG,n01440764,tench
1,https://cleanlab-public.s3.amazonaws.com/StudioDemoDatasets/imagenet-1k/n01440764/n01440764_18.JPEG,n01440764,tench
2,https://cleanlab-public.s3.amazonaws.com/StudioDemoDatasets/imagenet-1k/n01440764/n01440764_21955.JPEG,n01440764,tench
3,https://cleanlab-public.s3.amazonaws.com/StudioDemoDatasets/imagenet-1k/n01440764/n01440764_10698.JPEG,n01440764,tench
You’ll replace the url column with public URLs for your own images. If you’re using your own dataset (rather than ImageNet), the class_id column is unnecessary and you can replace the class_name column with your own label column.
Optional: Download raw ImageNet dataset and upload images to S3 (click to expand)
Step 1: Download and unzip the ImageNet dataset
You can download the ImageNet dataset as a torrent from academic torrents. To do this, you’ll need to have a Bittorrent client. We recommend aria2 which can be installed in a terminal as follows:
Linux: sudo apt update && sudo apt install -y aria2
Mac: brew install aria2
Once you have aria2 installed, you can download ImageNet using:
aria2c https://academictorrents.com/download/c5af268ec55cf2d3b439e7311ad43101ba8322eb.torrent
(Warning: this requires around 166GB of disk space)
This will download the dataset as a tar.gz file which you can extract in a terminal using:
tar -xvf [path to downloaded file]
(Warning: this requires an additional 173GB of disk space)
You should now have a folder with the following structure:
|-- ILSVRC
|   |-- Annotations
|   |-- Data
|   |   |-- CLS-LOC
|   |   |   |-- train
|   |   |   |-- test
|   |   |   |-- val
|   |-- ImageSets
For the purposes of this demo, we’ll only be working with the ImageNet training set which can be found in the ILSVRC/Annotations/Data/CLS-LOC/train directory
Step 2: Upload images to S3
To upload your dataset images to S3, we recommend using s5cmd (click here for more info and installation instructions). Use the following command to upload your images:
s5cmd cp -f ILSVRC/Annotations/Data/CLS-LOC/train/* s3://[your bucket name]/
Make sure the images uploaded to S3 are publicly accessible (you can configure your bucket permissions through the AWS console).
For this tutorial we assume you have images in a public S3 bucket organized in the following structure:
|-- <bucket_name>
|   |-- <imagenet_class_id_0>
|   |   |-- <class_id_0_img_0>
|   |   |-- <class_id_0_img_1>
...
|   |-- <imagenet_class_id_n>
...
We’ll be creating a dataset with “id” (row index), “url” (S3 object URLs for your images), “class_id” (ImageNet class IDs), and “class_name” (human readable class names) columns using the following code:
First, setup your S3 client and some helper functions to iterate through your images in S3.
from typing import Generator

# initialize boto3 S3 client
# you may need to provide credentials
# (as described here https://boto3.amazonaws.com/v1/documentation/api/latest/guide/credentials.html)
s3_client = boto3.client("s3")

s3_bucket = "<insert your S3 bucket name>"

# optional prefix within your S3 bucket where your dataset images are located
# set to empty string if your directory structure exactly matches the example
# structure in the section above
s3_prefix = "<insert your prefix>"
Optional: Initialize helper methods to iterate through class directories (click to expand)
def list_class_directories(bucket: str, prefix: str) -> Generator[str, None, None]:
    paginator = s3_client.get_paginator("list_objects_v2")
    result = paginator.paginate(Bucket=bucket, Prefix=prefix, Delimiter="/")
    for page in result:
        if "CommonPrefixes" in page:
            for class_dir in page["CommonPrefixes"]:
                yield pathlib.Path(class_dir["Prefix"]).name

def list_image_filenames(bucket: str, class_prefix: str) -> Generator[str, None, None]:
    paginator = s3_client.get_paginator("list_objects_v2")
    result = paginator.paginate(Bucket=bucket, Prefix=class_prefix)
    for page in result:
        if "Contents" in page:
            for obj in page["Contents"]:
                yield pathlib.Path(obj["Key"]).name
Next, load the mapping we’ve created from ImageNet class IDs to human readable labels.
class_id_to_label = requests.get(
    "https://cleanlab-public.s3.amazonaws.com/StudioDemoDatasets/imagenet-1k/class_id_to_label.json"
).json()
Finally, iterate through your images to build your DataFrame.
class_dfs = []
for class_id in tqdm(list_class_directories(s3_bucket, s3_prefix)):
    class_name = class_id_to_label[class_id]
    class_df = pd.DataFrame()
    s3_class_prefix = str(pathlib.Path(s3_prefix).joinpath(class_id))
    class_df["url"] = [
        f"https://{s3_bucket}.s3.amazonaws.com/{s3_class_prefix}/{img_filename}"
        for img_filename in list_image_filenames(s3_bucket, s3_class_prefix)
    ]
    class_df["class_id"] = class_id
    class_df["class_name"] = class_name
    class_dfs.append(class_df)

df = pd.concat(class_dfs, ignore_index=True)

# Optional: to get your dataset in the same order as ours
df = df.sort_values(by="class_id", ignore_index=True)

df.index.name = "id"
df = df.reset_index()

# Optional: save dataframe to CSV file (not necessary if uploading via our Python API)
df.set_index("id")
df.to_csv("imagenet.csv")
display(df.sample(5))
| id | url | class_id | class_name | |
|---|---|---|---|---|
| 1138521 | 1138521 |  |
n04536866 | violin |
| 171438 | 171438 |  |
n02009912 | great egret |
| 1067267 | 1067267 |  |
n04347754 | submarine |
| 951605 | 951605 |  |
n04005630 | prison |
| 386329 | 386329 |  |
n02167151 | ground beetle |
You now have a dataset that’s ready to upload to Cleanlab Studio!
Upload Dataset
This tutorial will focus on using the Python API, but you can also use our Web UI for a no-code option (click to expand)
If you would like to upload your data without writing code, simply go to https://app.cleanlab.ai/upload and follow these steps:
- Click “Upload from your computer”
- Drag & Drop or select the CSV file you saved from the DataFrame you created in the Prep Data section
- Click “Upload” and wait for the file to upload
- Click “Next”
- Select “id” as the ID column for your dataset. Leave everything else on the schema editing page as default
- Click “Confirm”
- Wait for data ingestion to complete
You can upload your dataset to Cleanlab Studio using our Python API with the following code:
# you can find your API key by going to app.cleanlab.ai/upload,
# clicking "Upload via Python API", and copying the API key there
API_KEY = "<insert your API key>"

# initialize studio object
studio = Studio(API_KEY)

# upload dataset
dataset_id = studio.upload_dataset(df, dataset_name="ImageNet", schema_overrides=[{"name": "url", "column_type": "image_external"}])
Create a Project
Creating a project in Cleanlab Studio will automatically run our data quality checks on your dataset. Since ImageNet is a large dataset (with 1.2 million images), it will take a while (around 20 hours) for your project to be ready.
Web UI instructions (click to expand)
To create a project for your dataset, navigate to the Cleanlab Studio Dashboard and follow these steps:
- Find your dataset in the datasets grid and click the “Create Project” button.
- Enter a name for your project (you can change this later).
- Make sure “Image Classification” and “Multi-Class” are selected for the Machine Learning Task and Type of Classification options.
- Select “class_name” as your label column.
- Select “Use a provided model” and “Fast” for the model type.
- Click “Clean my Data”.
Using your dataset_id from step 2, you can create a project with one line of code!
project_id = studio.create_project(
    dataset_id,
    project_name="ImageNet",
    modality="image",
    model_type="fast",
    label_column="class_name"
)
Once you create your project, you’ll need to wait for it to complete before proceeding with this tutorial. You can check your project’s status in the Cleanlab Studio Dashboard or using the Python API. You’ll also receive an email when the project is ready.
Web UI instructions (click to expand)
Navigate to the Cleanlab Studio Dashboard. Find your project in the Projects grid and view it’s status.
You can programmatically wait until the project has completed in the Python API using the code below. This may take a long time for big datasets!
cleanset_id = studio.get_latest_cleanset_id(project_id)
print(f"cleanset_id: {cleanset_id}")
studio.wait_until_cleanset_ready(cleanset_id)
This function will continuously poll for your project status and wait until the project is ready. You can optionally provide a timeout parameter after which the function will stop waiting even if the project is not ready. If your Jupyter notebook has timed out during this process, then you can resume work by re-running this cell (which should return instantly if the project has completed training; do not create a new Project).
View Your Project and Make Corrections
View Your Project
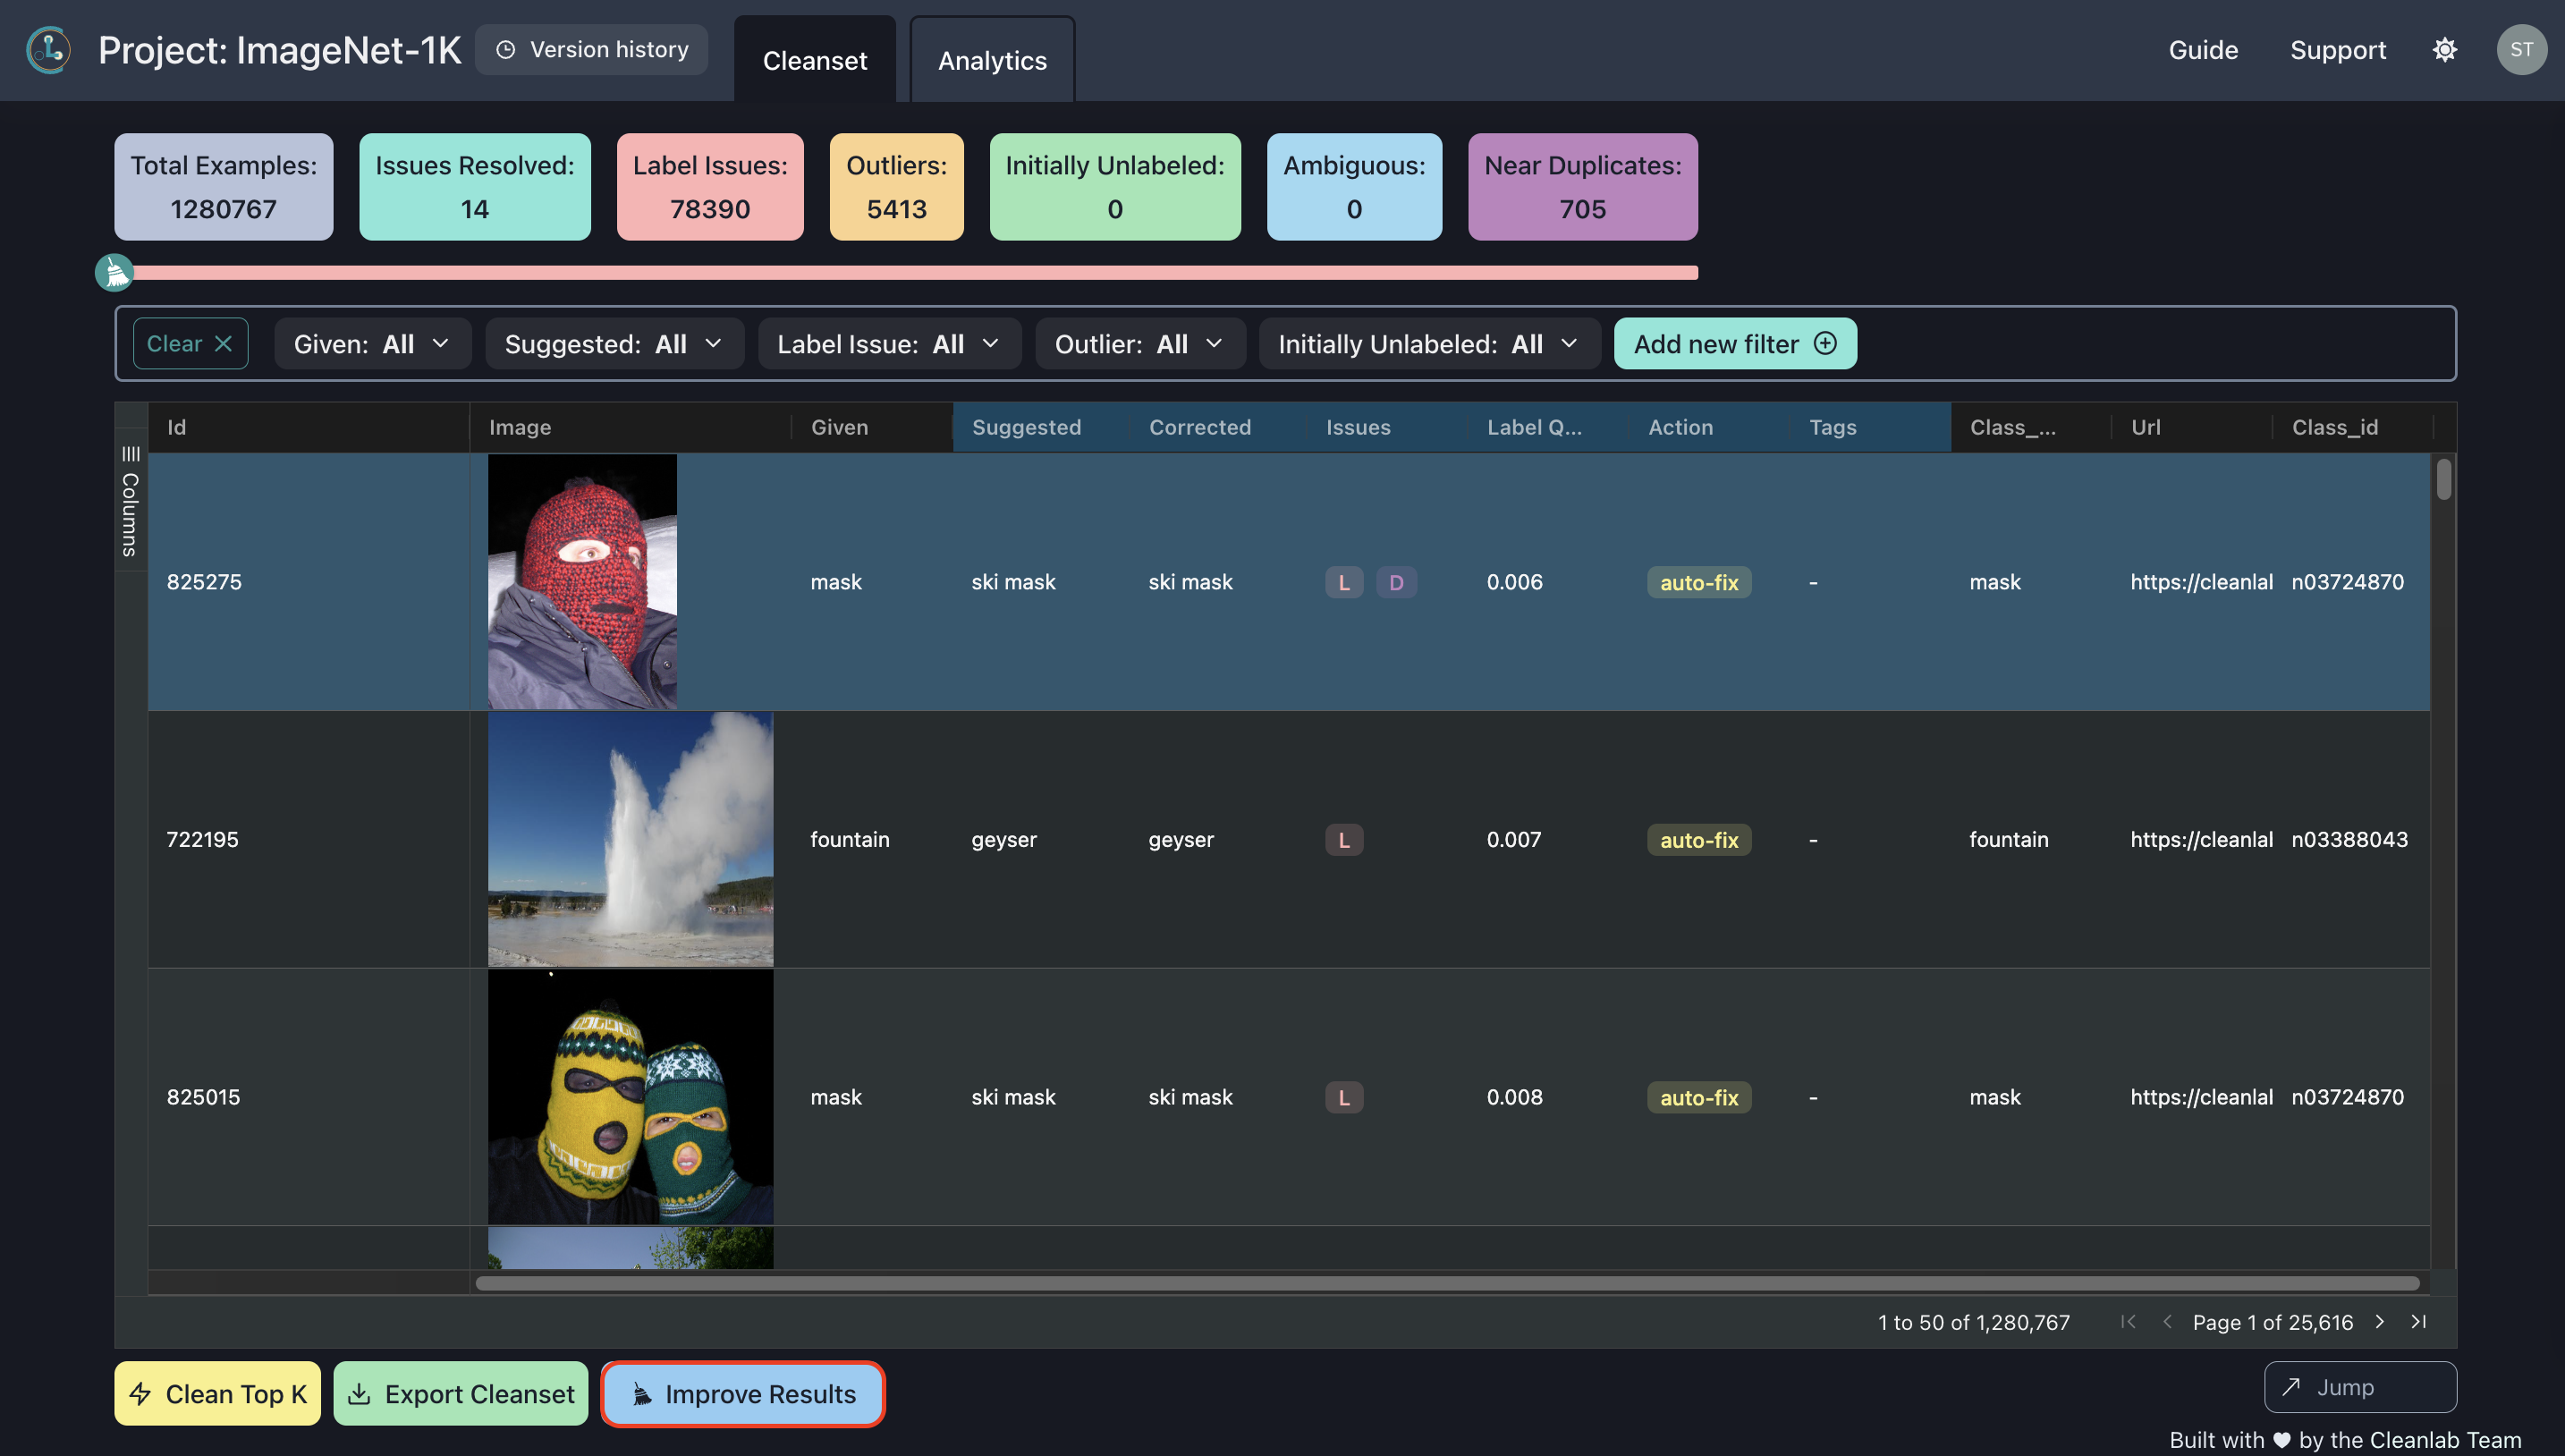
Once your project’s ready, you can view the results and make corrections to your dataset! This step is best done through the Web UI. To find your project results, navigate to the Cleanlab Studio Dashboard and click on your project name. You should see a page that looks like this:
Here you can browse through and view analytics on the data issues Cleanlab Studio found in your project, make corrections based on Cleanlab Studio’s suggestions, and eventually export your improved dataset.
Make Corrections
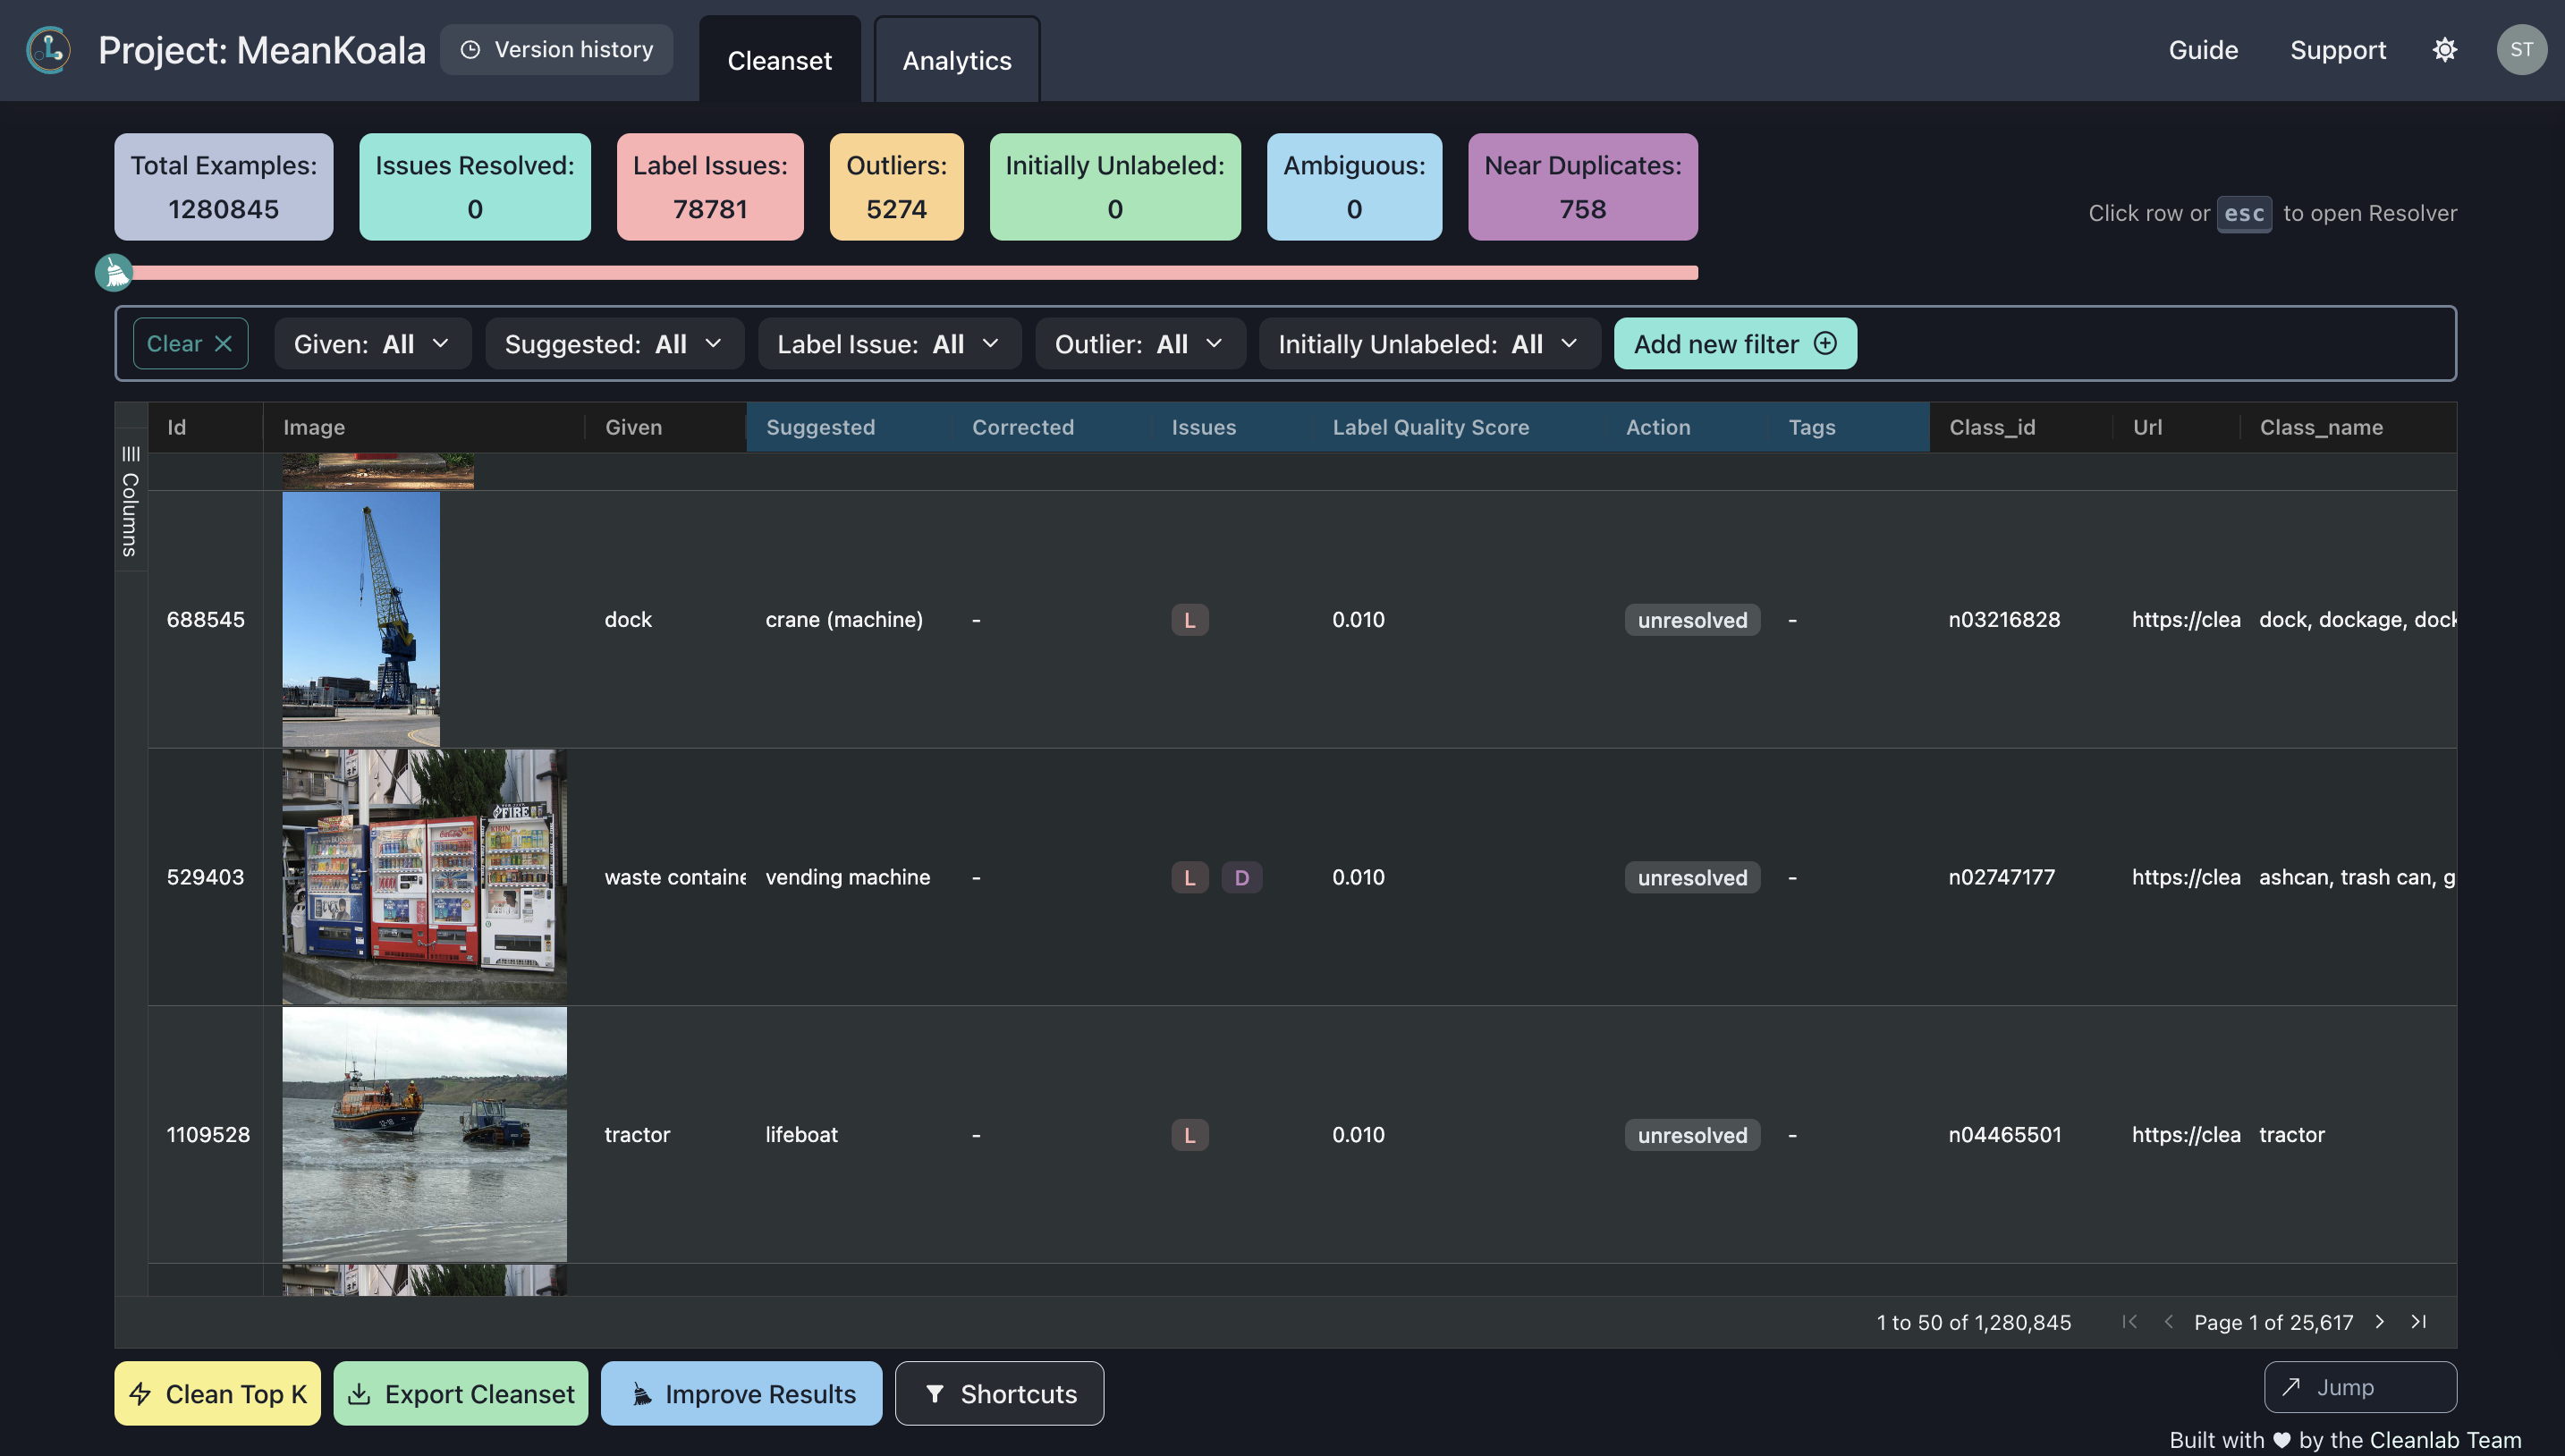
You can make corrections to your dataset by using the resolver panel on your project page (click any row in the project grid for the resolver to appear). If you would like to make correct multiple datapoints at once, you can use the “Clean Top K” button at the bottom of the project page or select multiple rows in the project grid and apply an action to those rows.
For the purposes of this tutorial, try correcting a few labels and excluding some rows from your dataset. See the video below for an example:
For a deeper analysis of Cleanlab Studio’s results on ImageNet, read our blog post here
Export Your Cleaned Data
Once you’re happy with the corrections you’ve made to your dataset, you can export your cleaned data through the Web UI (100MB export limit) or Python API. This tutorial will focus on exporting through the Python API since your ImageNet project will be too big to export completely through the Web UI, but we’ve also included instructions for exporting a subset of your data through the Web UI.
Web UI instructions (click to expand)
To export a subset of your data through the Web UI, follow these steps:
- Navigate to your project page
- Filter your project, so that a subset of the rows are displayed (i.e. all rows you corrected or all rows with label issues). You should be able to export around 450k rows without exceeding the 100MB Web UI export limit.
- Click the “Export Cleanset” button at the bottom of the page.
- Select the “Custom” export configuration.
- Click “Export”.
To export through the Python API, use the following code:
# `df` should be the same DataFrame you created to upload your data to Cleanlab Studio
# if you did not upload using the Python API,
# uncomment out the following code before running `studio.apply_corrections()`
# studio = Studio("<INSERT YOUR API KEY>")
# cleanset_id = "<INSERT YOUR CLEANSET ID>"

cleaned_df = studio.apply_corrections(cleanset_id, df)
You should see that labels you fixed are reflected in the resulting DataFrame. In our project, we corrected the label for row 1026223 from “slot machine” to “vending machine”:
# original dataset
display(df[df["id"] == 1026223])
| id | url | class_id | class_name | |
|---|---|---|---|---|
| 1026223 | 1026223 |  |
n04243546 | slot machine |
# cleaned dataset
display(cleaned_df[cleaned_df["id"] == 1026223])
| id | url | class_id | class_name | |
|---|---|---|---|---|
| 1026223 | 1026223 | |
n04243546 | vending machine |
We also corrected labels for a few other rows:
original = df.set_index("id").loc[
    [825275, 722195, 825015, 940053],
    ["url", "class_name"]
]
corrected = cleaned_df.set_index("id").loc[
    [825275, 722195, 825015, 940053],
    ["url", "class_name"]
]

display(original.merge(corrected, on=["id", "url"], suffixes=("", "_corrected")))
| url | class_name | class_name_corrected | |
|---|---|---|---|
| id | |||
| 825275 |  |
mask | ski mask |
| 722195 |  |
fountain | geyser |
| 825015 |  |
mask | ski mask |
| 940053 |  |
pole | maypole |
You should also see that any rows you excluded are dropped in the resulting DataFrame. In our project, we excluded row 529403 since it was a duplicate of row 1026223. We should that there’s no longer a row with id 529403 in our cleaned dataset:
529403 in cleaned_df["id"]
Congrats! You now have an improved version of the famous ImageNet dataset!
(Bonus!) Improve Results by Rerunning Cleanlab
An additional awesome thing about Cleanlab, is that you can rerun Cleanlab on your improved dataset to get even better results! To try this, click the “Improve Results” button at the bottom of your project page.